Home > Planting trees > Specifications/standards > Sample planting specifications
Sample planting specifications for trees
(This is an example that can be modified to meet your needs and site conditions)
Edward F. Gilman, Professor, Environmental Horticulture Department
University of Florida Gainesville
egilman@ufl.edu
Before digging the hole in well drained soil, 1) locate the point where the top-most root emerges from the trunk (it should be within the top 2 inches of the ball), and 2) measure the distance between the top-most root and the bottom of the root ball. Dig the hole about 10% shallower than this depth and as wide as possible (at least 1.5 times the width of the ball). If the top-most root is deeper than 2 inches remove soil so it is within the top two inches. Severe circling roots where appropriate. The root ball should be positioned in the hole so the finished grade of the landscape soil is even with or slightly lower than the point where the top-most root emerges from the trunk (see illustration at right and below). Then apply soil or mulch so it covers the sides of the root ball.
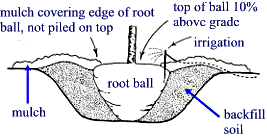 Be sure that when you are finished planting, there is NO LANDSCAPE SOIL, and little or no mulch, placed over the top of the root ball. Landscape soil (as well as thick mulch layers more than 1 or 2 inches deep) spread over the root ball can prevent water and air from entering the root ball. When finished planting, the point where the top-most root in the root ball originates from the trunk should be within the top two inches of the root ball. The trunk flare might be visible on some trees depending on age and tree type. In poorly drained soil, position the root ball shallower than indicated above to fit the conditions of the site.
Mulch should only cover the edge of the root ball since thick layers over the root ball can keep it too moist or too dry. Mulch on the trunk can also cause bark deterioration and encourage trunk disease. Locate the irrigation device so it delivers water to the root ball. There is usually no need to water areas outside the root ball. No amendments of any kind are necessary in the backfill soil because extensive research clearly shows that they typically do not increase survival nor growth after planting.
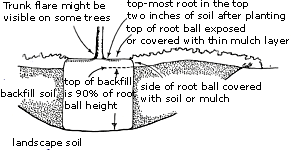
Tip: Do not place soil over the root ball.
Fertilization: Slow release (or controlled release) fertilizer can be applied on top of the root ball and backfill soil or on top of the mulch at planting. There is no need to mix it with the backfill soil or place it at the bottom of the planting hole since most roots end up close to the soil surface in urban and suburban landscapes. Under most circumstances, mulch will not steal the fertilizer from the tree. Adding slow release fertilizer at planting has not been associated with either improved survival nor increased growth after planting. It will not hurt the plant provided it is applied according to the directions on the product. On the other hand, adding soluble fertilizer to a newly installed plant could burn roots if too much is applied. This will injure the plant and could kill it. Any nitrogen source can be applied to established trees with about the same effect.
Mulching: Weed and turf suppression during establishment is essential. Apply a 3-inch thick layer (after settling) of mulch around the plant to help discourage weeds. This area should be maintained during the establishment period at least two feet in diameter for each inch of tree trunk diameter (minimum diameter should be eight feet for trees with a trunk diameter less than 3 inches). If you wish to place mulch over the root ball, apply only a thin layer over the outer half of the root ball. This keeps the trunk dry and allows rainwater, irrigation, and air to easily enter the root ball. Mulch resting on the trunk and applying too thick a layer can stress the plant by oxygen starvation, death of bark, stem and root diseases, prevention of hardening off for winter, rodent damage to trunk, keeping soil too wet, and repelling water. Mulch on the root ball has little impact on water lose from the tree since about 90% of the moisture that leaves the root ball does so by transpiration, not evaporation. Only about 10% leaves the root ball by evaporation from the surface of the root ball.
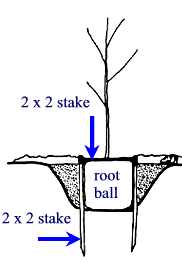
Staking: In many instances, if root balls are heavy enough stakes are not necessary. Stake to stabilize the root ball.
Two or three (2 shown) wood dowels driven through edge of root ball. These do not have to be removed because they simply rot in place. There is no danger of this system girdling the trunk since nothing is attached to the trunk
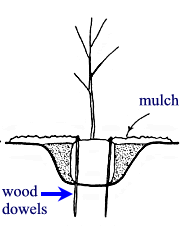
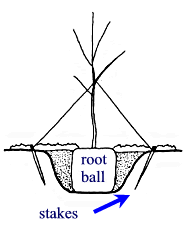
Traditional staking could girdle the trunk.
One horizontal 2 in. x 2 in. stake screwed to two vertical 2 x 2s against the side of the root ball. A second set is used on the other side for larger trees if needed.
Establishment: Trees provided with regular irrigation through the first growing season after transplanting require about 3 months (hardiness zones 9-11), 6 months (zones 7-8), or up to 12 months (zones 2-6) per inch of trunk diameter to fully establish roots in the landscape soil. Trees that are under-irrigated during this establishment period often require additional time to establish because roots grow more slowly. Most trees are under-irrigated during the establishment period. Because roots are not fully established, be prepared to irrigate through the entire establishment period, especially in drought.
Irrigation: Unlike established plants, research clearly shows that recently transplanted trees and shrubs establish quickest with light, frequent irrigation. For trees planted in spring or summer, provide two (cooler hardiness zones) to three irrigations (warmer hardiness zones) each week during the first few months after planting. Daily irrigation in the warmest hardiness zones provides the quickest establishment. Following the initial few months of frequent irrigation, provide weekly irrigation until plants are fully established. At each irrigation, apply about 2 to 3 gallons of water per inch trunk diameter (e.g. 4-6 gallons for a 2-inch tree) over the root ball. Never add irrigation if the root ball is saturated.
| Size of nursery stock | Irrigation schedule for vigor 1,3 | Irrigation schedule for survival 2,3,4 |
|---|---|---|
| < 2 inch caliper | Daily for 2 weeks; every other day for 2 months; weekly until established. | Twice weekly for 2-3 months |
| 2-4 inch caliper | Daily for 1 month; every other day for 3 months; weekly until established. | Twice weekly for 3-4 months |
| > 4 inch caliper | Daily for 6 weeks; every other day for 5 months; weekly until established. | Twice weekly for 4-5 months |
Notes on Irrigation:
1.) Delete daily irrigation when planting in winter or when planting in cool climates. Irrigation frequency can be reduced slightly (e.g. 2-3 times each week instead of every other day) when planting hardened-off, field-grown trees that were root-pruned during production. Establishment takes 3 (hardiness zones 10-11) to 4 (hardiness zones 8-9) to 8 (hardiness zones 6-8) to 12 (hardiness zones 2-5) months per inch trunk caliper. Never apply irrigation if the soil is saturated.
2.) Irrigation frequency can be reduced slightly (e.g. to once or twice each week) when planting hardened-off, field-grown trees that were root-pruned during production.
3.) At each irrigation, apply 1-2 gallons (cool climates) or 2-3 gallons (warmest climates) per inch trunk caliper to the root ball. Apply it in a manner so all water soaks into the root ball. Do not water if root ball is wet/saturated on the irrigation day.
4.) Trees take much longer than regularly irrigated trees. Irrigate in drought the following summer.

