Home > Planting trees > Planting details > Steps to planting a tree
Steps to planting a tree
(click on illustrations for more information)
- Look up. If there is a wire, security light, or building nearbythat could interfere with properdevelopment of the tree canopy as it grows, plant elsewhere.
- Dig a shallow planting hole as wide as possible. Shallow is
 better than deep! Many people plant
trees too deeply. A hole two or three times the width of the root ball is often recommended
but about one-and-one-half the diameter is more common. Wider holes should be
used for compacted soil and wet sites. This might help roots from becoming deformed
by the edge of the hole in compacted or clayey soils. In most instances, the
depth of the hole should be LESS than the height of the root ball, especially
in compacted or wet soil. If the hole was inadvertently dug too deep, add soil
and compact it firmly with your foot. Breaking up compacted soil in a large area (out
to the dripline of the tree) around the tree provides the newly emerging roots
room to expand into loose soil. This will hasten root growth translating into
quicker establishment. Loosen the soil with a rototill, shovel, or another tool.
better than deep! Many people plant
trees too deeply. A hole two or three times the width of the root ball is often recommended
but about one-and-one-half the diameter is more common. Wider holes should be
used for compacted soil and wet sites. This might help roots from becoming deformed
by the edge of the hole in compacted or clayey soils. In most instances, the
depth of the hole should be LESS than the height of the root ball, especially
in compacted or wet soil. If the hole was inadvertently dug too deep, add soil
and compact it firmly with your foot. Breaking up compacted soil in a large area (out
to the dripline of the tree) around the tree provides the newly emerging roots
room to expand into loose soil. This will hasten root growth translating into
quicker establishment. Loosen the soil with a rototill, shovel, or another tool.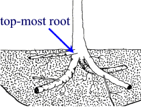
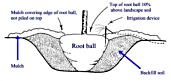
- Find the point where the top-most root emerges from the trunk. If this is buried in the root ball then remove enough soil from the top so the point where the top-most root emerges from the trunk is at the surface (preferably) or within 2 inches of the surface. A swelling (called trunk flare, root flare, root crown) may or may not be present where the top-most roots join the trunk. Soil above the top-most root may have to be removed to check for these (See: details). Burlap on top of the ball may have to be removed to locate the top root if it more than 2 inches below the soil surface.
- Slide the tree carefully into the planting hole. To avoid damage when setting the tree in the hole, lift the tree with straps or rope around the root ball, not by the trunk. Special strapping mechanisms need to be constructed to carefully lift trees out of large containers.
- Position the point where the top-most root emerges from the trunk slightly above the landscape soil surface. Most horticulturists agree and scientific literature on landscape sized trees shows that it is better to plant the tree a little high than to plant it too deeply. If the tree is too deep in the hole, remove it from the hole and firmly pack soil in the bottom of the hole to raise the root ball. If it is only a little deep, tip the ball to one side and slide some soil under it; then tip it back the other way and slide some more soil under the ball. Continue this until it is set at the appropriate depth; do not make the trunk loose in the root ball when you do this. Remove most soil and roots from on top of the root flare and any growing around the trunk or any that are circling (See: removing soil and roots). Once the root flare is at the appropriate depth, pack some soil around the root ball to stabilize it. Soil amendments are usually of no benefit. The soil removed from the hole and from on top of the root ball makes the best backfill unless the soil is terrible or contaminated. Insert a square-tipped balling shovel into the root ball tangent to the trunk to remove the entire outside periphery. This removes all circling and descending roots on the outside edge of the root ball (See: shaving the root ball to remove the periphery).
- Straighten the tree in the hole. Before you begin backfilling have someone view the tree from two directions perpendicular to each other to confirm the tree is straight. Fill in with some more backfill soil to secure the tree in the upright position. Once you add large amounts of backfill, it is difficult to reposition the tree.
- Remove synthetic materials from around trunk and root ball. Synthetic burlap needs to be completely removed from the root ball; treated burlap can be left in place in the eastern US. String, strapping, plastic, and other materials that will not decompose must be removed from the trunk at planting. A few people attempt to remove some or all of the wire from wire baskets before backfilling; this may void any guarantee that came with the tree (See: more on removing wire basket).
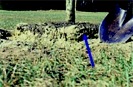
- Slice a shovel down into the backfill 20 to 30 times all around the tree as you add backfill soil to break up soil clumps as much as possible. Loosen soil around the hole by digging with a shovel or appropriate machinery. Step firmly on the backfill soil but do not compact it because this could restrict root growth, especially in clayey soil. When the planting hole is filled with soil the root ball should remain 1 (small trees) to 3 (larger trees) inches above the backfill soil as shown in the photograph at left. Add 10 to 20 gallons of water to the root ball and backfill by plunging the hose into the soil. Fill in any holes or depressions with additional backfill soil and again firm the backfill with your foot.
- Cover the exposed sides of the root ball with mulch and apply mulch to at least an 8 foot diameter circle AROUND but not ON the root ball. Mulch on top of the root ball can retain water meant for the root system, provide habitat for animals that can injury the bark, and encourage formation of stem girdling roots. The concept of mulch reducing water loss from the root ball has not been demonstrated with research. Construct a berm out of mulch at the edge of the root ball only if the tree will be watered with a hose, bucket, or other high volume means. Constructing a berm in other situations will not provide more water to the root system. Do not construct a berm from soil since this soil typically ends up over the root ball several months later. Water the mulch well after it is spread. See: mulch precautions.
- Stake the tree, if necessary to hold the root system firm in the soil. If the root system moves in the wind, emerging roots could break and trees will establish slowly. Staking to hold a weak trunk upright should not be necessary on trees with a trunk diameter more than about 1.5 inches. If large trees require staking to prevent the trunk from bending, it probably indicates a lesser quality tree with poor trunk taper or poor root system. Trees smaller than 1.5 inches might require staking until enough trunk strength develops. Trees could establish more quickly and develop a slightly stronger trunk and root system if they are not staked at the time of planting.
- Come back to remove hardware about one year after planting. Staking devices attached to or wrapped around the trunk should be removed. Wire loops or exposed parts of wire baskets can be removed at this time.